


Monthly Archives: May 2024
-
 Read more ...
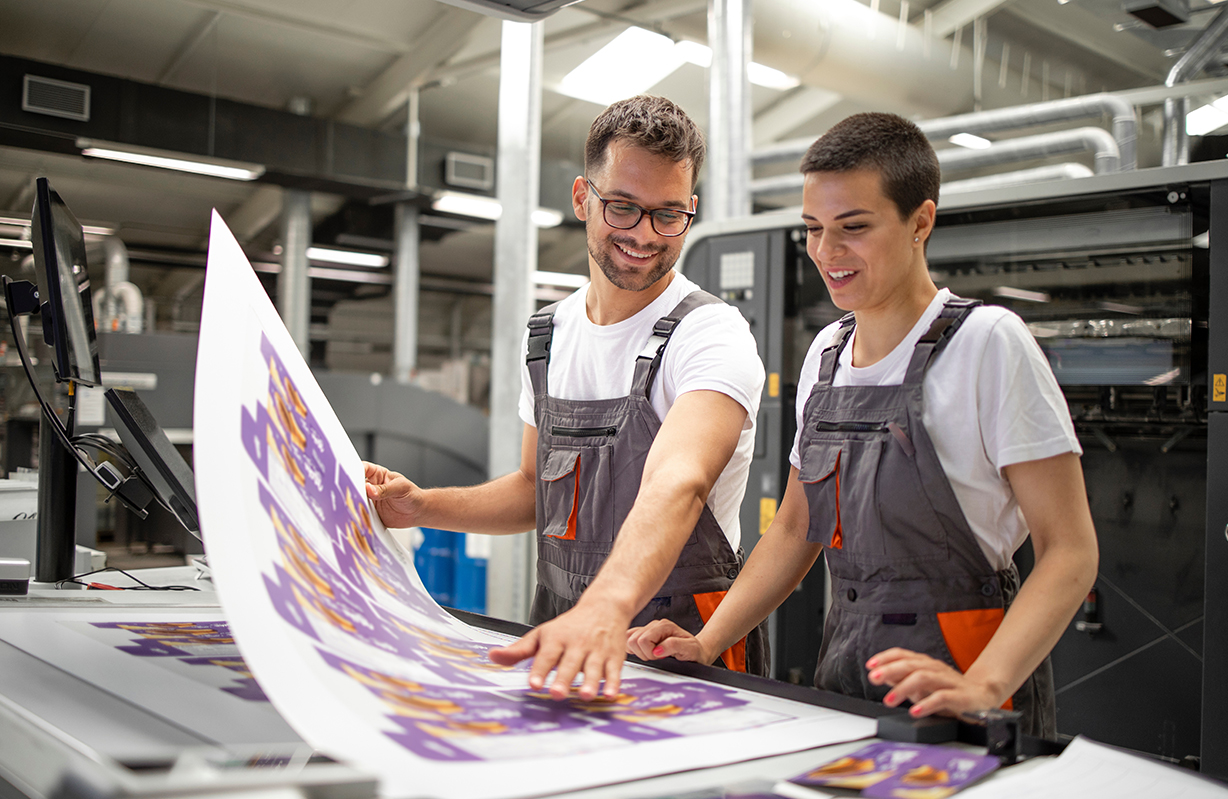
Raster Image Processing software, commonly known as RIP software, is an integral tool for any printing professional looking to deliver the finest quality of prints with the sharpest detail and colour variance. But what actually is RIP software, and how does it work? Even experienced employees, who have worked in the printing industry for many years, may find their knowledge about this topic limited.
There is a fair bit to uncover, even about the basics of RIP software. It is also equally important to know how RIP software differs from other regular printer drivers and how it performs to fundamentally improve your images. With the help of this article, expect to advance your understanding of RIP software and explore our expert tips, plus advice, on using it to fully capitalise on its benefits.
What Is RIP Software?
RIP software is a type of software that offers more control over your print production. It optimises digital images for printing by converting them from their native file formats into high-resolution raster images. With RIP software, you'll have control over every element of your workflow, from image editing to colour accuracy and overall print quality.
You can use it to adjust your image's colour, brightness, and contrast and handle other advanced printing techniques. On a technical level, there is so much you can do with RIP software to generate better prints.
RIP software aims to make printing easier, faster, and more accurate. It bypasses all other programs, allowing your computer to communicate directly with your digital printer. A computer-aided design operator will have access to pre-designed products and an option to create unique, customised print designs. If you would like to produce high-quality prints, RIP software can help you in the following ways:
- Easy manipulation of print (scaling, rotating, cropping)
- Creation of a more efficient printing process
- Automation of duplicate tasks like the placement of multiple files on a single sheet
- Ensuring consistency across multiple printers
- Creation of presets depending on your needs
- Accurate control over the print's colours
Image print RIP software eliminates the complexities of printing while ensuring you achieve superior printing quality.
Key Benefits of RIP Software
Speed
One of the key benefits of RIP software is its speed in processing your prints. The entire process happens within minutes, allowing your company to meet customer demands while retaining high quality. You can process multiple files, easily manipulate your prints, and create presets that speed up your printing process.
RIP software allows you to produce high-quality products by giving you complete control over the print files. You can adjust your print's scaling, opacity, colour correction, dot size, and other features to meet the desired print quality. This is especially crucial when printing large format prints. RIP software can resize your images while maintaining their quality.
Production Efficiency
RIP provides efficient functionalities and features that significantly optimise your company's printing workflow. It supports the simultaneous processing of multiple large files and ensures accurate prints and consistency across various printers.
Therefore, using RIP for your daily printing tasks means fewer reprints, reducing the wastage of paper and ink. This results in more efficient production that saves time and money.
How to Properly Use RIP Software for Printing
RIP software is essential in the production of high-quality printed products. It can be easily installed and used with different printers, including large format printers. Here is how to properly use RIP software for printing and enjoy the numerous workflow benefits.
Prepare Your Files for Printing with RIP Software
Image print RIP software offers an intuitive interface that makes it easy to prepare your files for printing through the following steps.
Set Up Print Parameters
After you launch ImagePrint RIP software, you can set up your print parameters:
- Select your Printer
- Set the Page Size, Quality, Roll/Sheet and Media Type
These settings may vary depending on the printer you're using.
Select Your Media Outlet Profiles
You can take the following steps to select a Printer Profile for the paper you'll use:
Click on Choose by Profile to choose from already downloaded profiles.
Configure Your Colour Management Settings
After acquiring the printer profiles, configure your colour management settings:
- Expand the Printer selection area.
- Select either ImagePrint manages colours or Printer manages colours.
Send Your Files to a Printer Using RIP Software
When you're ready to print, you can send your file to a printer by:
- Click on the Print button at the top of the Dashboard.
- Click OK to confirm your print settings.
Monitor the Printing Process
You can use Spoolface to control and monitor the printing process through the following steps:
- Click on the Printer icon on the top right to open the Job Manager.
- Look at the top Active side to see the job that's printing.
- Monitor the job's progress in the Job Progress area on the right. It'll also show any errors or warnings that may arise.
- Once it's done, it'll move to the bottom Saved side.
- Monitor the printer's current status at the bottom left corner. Error codes will appear here in case the job runs into a problem.
What Are Some of the Advanced RIP Software Techniques?
RIPs offer a wide range of advanced features that enhance the printing process while improving the final product's quality. These features include:
- Colour management: Image print RIP software allows you to create ICC profiles, modify ink capacity, and offer linearisation control. You'll have superior colour management features to help you create accurate prints.
- Halftoning: Creates halftone patterns to ensure high-quality production of continuous-tone images
- Automation: Automate the printing process, including repetitive print jobs such as smart cropping, sizing, multi-page layout, tiling, and more.
- Scaling: Scale images without losing resolution.
- Job management: Manage print jobs such as scheduling and tracking.
With RIP software, you can effortlessly produce high-quality prints that meet and exceed your expectations.
Ensure Print Quality and Production Efficiency by:
Nesting
Nesting allows you to combine multiple files into one print job. RIP software will automatically organise images, shapes, and objects to maximise your print material. It will calculate and figure out the best positions to place them. This ensures efficient use of the space on your print, reducing the wastage of materials.
Tiling
RIP software includes tiling features, allowing you to print larger images without cutting off design elements. When an image is larger than your media size, tiling breaks it into specific sizes your printer can handle. Tiling separates the design image into multiple pieces that can then be printed on multiple pages. Tiling is crucial when you get a job too wide for your printer.
Imposition
When printing your work, RIP software utilises the imposition feature to combine various print works and print them simultaneously. This minimises the printing time and significantly reduces paper waste by maximising the number of orders per impression and thoroughly filling the print sheet. Proper planning and positioning allow your work to be printed effectively and in an orderly fashion.
Reach Out to PSW to Learn More About RIP Software
RIP can greatly affect your printing processes and output quality. It enables creativity, streamlines production, and improves workflow while reducing costs. Therefore, if you would like to increase efficiency and improve profitability, consider investing in RIP software and a high-quality large format printer.
At PSW, we have the right printing solutions for your business. We can help you utilise powerful RIP software to produce high-quality printed products with our extensive range of top-notch large format printers. Contact us today to learn more.
-
 Read more ...
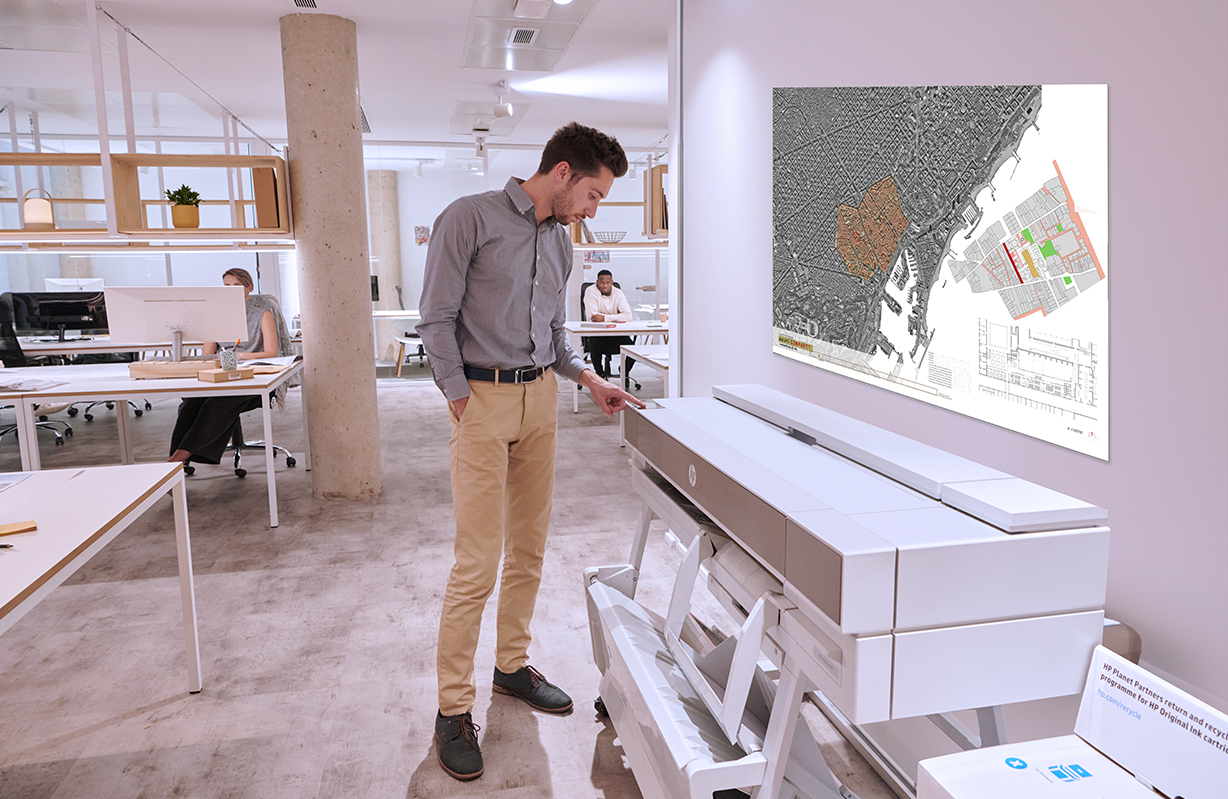
Converting GIS data into high-quality large-format prints is critical in effectively communicating spatial information. Whether it's creating maps, posters, or visualisations, accurate and vividly aesthetic representations of GIS data are essential. They facilitate meaningful discussions about geospatial observations and patterns in the GIS and topographic industry.
This article will explore the entire process of transforming GIS data into detailed large-format prints. These documents can empower GIS professionals and topographers to use their GIS data for meaningful analysis. From preparing the data to selecting the right printer and optimising print settings, a comprehensive breakdown of each important step in the conversion process will be discussed in detail.
Why Convert GIS Data Into High-Quality Large-Format Prints?
Geographic information systems (GIS) produce data that experts use in the real world - often for large-scale projects like land development, architecture, and city planning. High-quality and large-scale prints are essential to many workflows. So being able to create them with large-scale printing is a must.
The Link Between Quality GIS Data Output, Communication, and Decision-Making
GIS documents can inform decision-makers and help coordinate teams. Sometimes, they are the reference point for multiple teams working together. The accuracy of the GIS document can determine the accuracy of both decisions and coordinated work.
Understanding GIS Data Conversion
GIS documents are created by combining hundreds to thousands of data points layered into a single document. However, printers require image file types. Therefore, data conversion in GIS becomes an essential part of the process.
Converting GIS Data Into Printable Formats
GIS data must be compressed into a printable format. But that doesn't mean you have to lose detail or accuracy. Large-scale printers typically have the internal storage to handle very large, detailed, printable files.
Common File Formats
Used in GIS Compatibility With Large Format Printers The best file types for GIS printing are vector-based. This means they are lossless when scaled. File format options include:
- PNG
- SVG
- PSD
GIS Software and Tools in Preparing Data for Print
Several software options can be used in preparing GIS data for print—some GIS-specific and some for highly detailed image editing. Be sure the software you use can handle your mass of data without loss and output accurate vector graphics.
Preparing GIS Data for Print
What to Consider When Preparing GIS Data for Large Format Prints
When preparing GIS data for large format printing, you will need to prepare clear visual images that come out in a single printable layer, even if your original design document is a multi-layered mass of data. Consider data cleanup, projection adjustment, and scale adjustments when preparing for print.
Data Cleanup
Determine the exact data to be shown and make sure that data points do not create obscure messaging in your final print.
Projection Adjustments
If there are intentional map distortions, then make sure they are consistent across the document to convey the details necessary for your project.
Scale Adjustments
Scaling GIS data for printing is a critical stage that must be done either before converting your data to a printable form or with vector graphics that scale losslessly after file conversion.
Data Simplification and Generalisation for Improved Print Quality
It may be necessary to simplify and generalise your data to make clearer prints and achieve higher print quality. Too many points will create overlapping indicators that can reduce the clarity of your documents.
Selecting the Right Large Format Printer
The right printer is essential for large-format printing of GIS data. The printer must be able to hold the full size and detail of the document and print with extreme accuracy to provide the best quality print. Large Format Printers Suitable for GIS Data Prints Not all large-format printers have the specs necessary for GIS data or the available paper sizes to meet your needs. Large-format printers must be chosen based on the largest size and highest data quality you will need to print for future projects.
Printer Specifications and Capabilities Required
Printers for GIS large-format documents must have at least 150 dpi, and 300 dpi (dots per inch) is even better. You also need printers with a great deal of internal memory that can hold the large and highly detailed files that you need to print. The ability to handle tiling may also be essential to piece together even larger-sized maps.
Selecting a Printer That Can Handle GIS Data
It is always a good idea to consult printer manufacturers like HP to identify a large format printer that has what it takes to handle the demands of your GIS data.
Optimising Print Settings on a Large Format Printer
Print Settings That Produce Optimal GIS Data Printouts
If your desired GIS map size is bigger than the paper available, you can use tiling or 'poster' settings on your printer. Leave a margin on each page or allow for overlap so you can reconstruct the tiled map with a margin for error.
The Best Print Mode, Paper Type, and Ink Settings for GIS Data Output
Each printer will have specific settings available that will help increase the quality of your GIS data prints. Set your printer to the highest dpi and use the right combination of ink and paper for highly accurate details.
Quality Control and Proofing Prior to Printing Large Format GIS Data
Top Methods for Quality Control Prior to Large Format Printing Quality control depends on:
- Clear and simplified data
- Careful scaling of the map details, key, and indicators
- Test printing
Ensuring Data Accuracy, Visual Clarity, and Overall Print Quality
Simplify your data. Focus on visual clarity, and don't hesitate to use more than one map if you need to represent multiple layers of data. Some even print on sheer drafting pages to allow layer-by-layer overlays. Optimise your markups and keys and convert the whole document into a vector file type before test printing.
The Importance of Test Prints and Proofing
Test printing ensures that your final map is up to your quality standards. Printing a single tile can help you assess if the data is conveyed clearly enough and if the notations meet your needs.
Post-Printing Considerations About GIS Data Prints
How to Maintain GIS Data Prints' Durability and Longevity
Once your GIS document is fully printed, you will likely need it for active use. Large-form GIS printings tend to require protection so they can be used throughout a project but are more difficult to protect due to their large size. You will need to make sure a one-sheet or tiled map is kept flat and protected.
How to Protect and Best Showcase Your Large Format Prints
There are several possible methods to protect your prints.
Lamination
When you have a large enough laminator, you can machine-laminate your GIS print. This will seal two thin sheets of plastic over and around your GIS document, making it safe to pass around and actively use in a busy work site.
Mounting
You can mount your GIS map onto a board, giving it the durability and mobility of rigid backing. You can even seal over the mounted document with a sheet of plastic for safekeeping.
Framing
Place your GIS document in a glass-fronted frame. This can be useful for hanging a large-format map on the wall or even turning it into a live tabletop for better collaborative planning.
Troubleshooting Issues When Converting GIS Data into Large Format Prints Common
Issues Converting GIS Data Into Print Output
GIS printing sometimes requires a little troubleshooting to ensure that the maps come out with the quality, clarity, and utility that you require. Here are a few common issues and how to solve them.
Colour Inconsistencies
The colours on your screen and the colours achieved by a printer are not always the same. A more versatile printer with a wide colour range is ideal, but you may need to calibrate your printer settings to get the best results.
Artifacts
Artifacts can be flaws in the data image created during scaling or file conversion. Scale carefully and always ensure that your data points and key/notations have been translated into a printable format correctly.
Printing Errors
Printing errors can happen. Misalignment of the image to the paper, ink spots, dry ink cartridges, and memory buffer errors can occur. This is where test prints and settings adjustments come in handy.
Solutions and Tips to Achieve the Desired Print Quality
You can get the best quality GIS large-format prints by learning your printer and exploring the printer features with the help of a professional who understands all the printer settings and how each can impact the high-detail quality of your GIS printed documents.
Reach Out to PSW to Receive GIS Map Printing Solutions our HP printer experts will be happy to help you find the best high-quality plotter printer to create your large-scale GIS maps and documents.
-

Cheryl McLean at one of her workshops Cheryl McLean’s journey into the world of art and lettering began in her childhood, where she watched her grandfather create copperplate lettering with pen and ink. This early fascination with ornate patterns sparked a lifelong love of beautiful lettering. Cheryl took a formal sign painting course and then started her own business. The defining moment came when she was asked to create two large illustrated panels. With this project, she inadvertently created a niche for herself in what became known as “blackboard art”.
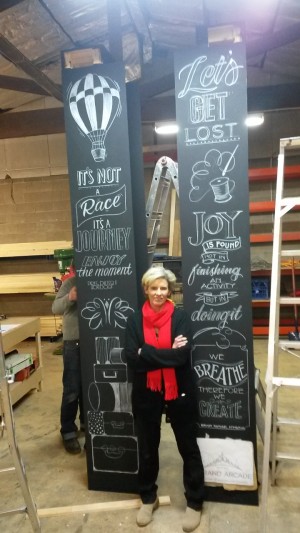 A niche becomes a worldwide success
Each project became a vibrant work of art, adorned with bright illustrations and colorful lettering that set them apart from digital print competitors. Cheryl’s hand-painted panels garnered praise and demand, with clients returning again and again to commission more, attributing their business success to her professional work. Cheryl’s dedication to her craft has earned her a loyal clientele throughout Sydney, where she works closely with clients. Alongside commercial work, Cheryl finds joy in taking on private commissions including murals, engagements and weddings, enriching people’s lives with her creativity and skill. In addition to her thriving business, Cheryl dedicates time to teaching workshops around the world, where she shares her passion for hand-painted signage and passes on the knowledge and skills she has gained in her twenty-five years in the industry.
One issue that arises for artists like Cheryl McLean is the challenge of shipping their artwork to clients around the world without it being damaged. Previously, artworks had to be collected in person or elaborately packaged to ensure they arrived safely at their destination. Not only can this be very time-consuming, but it can also incur additional costs and logistical complications. Therefore, there is a need for a solution that allows artists to send their work easily and safely without being tied to one location.
A solution for a global presence
At an exhibition, Cheryl discovered EasyDot® Chalkboard adhesive film, which turned out to be the perfect complement to her work. Its unique ability to be easily rolled up and shipped without damaging anything allows Cheryl to send her artwork to clients all over the world. The EasyDot® film also makes it easier to install, as it can be applied with little effort and no air bubbles. This discovery has not only improved Cheryl’s work processes but has also increased customer satisfaction by delivering high-quality and long-lasting results. Thanks to EasyDot®, Cheryl can make her designs in Australia and then easily ship them without having to be on-site. This flexibility allows her to offer her artwork internationally and reach customers worldwide without being bound by geographical restrictions. The ease of use not only facilitates shipping, but also on-site installation, which is a convenient solution for both Cheryl and her customers.
Special thanks
for the cooperation go out to Cheryl McLean and Sabine Giger.
Learn more about these fantastic artists on their Instagram: @Blackboardart_au @sabine_giger
Read more ...Posted: May 03, 2024| -
 Read more ...
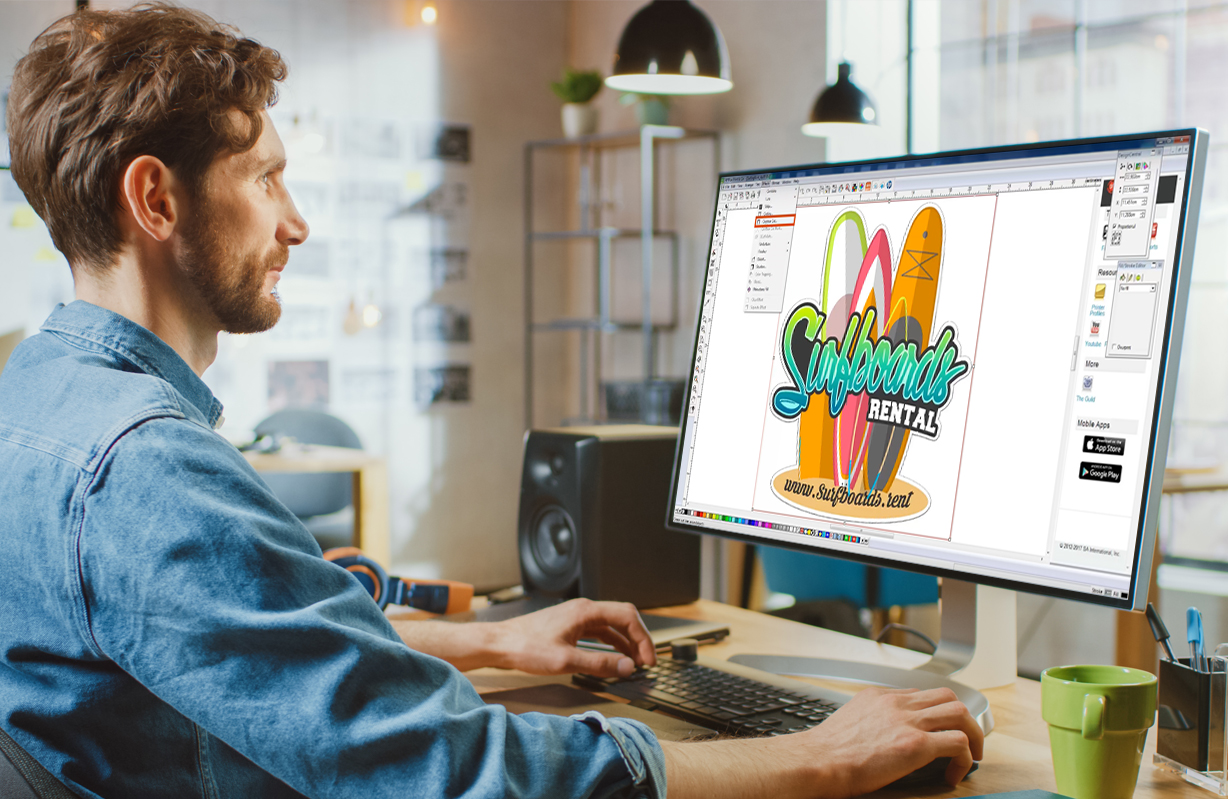
Exploring the Future of Flexi: Flexi Complete:- In the ever-evolving landscape of design and printing software, staying ahead of the curve is paramount. Enter Flexi Complete, the latest offering from SAi, promising a suite of cutting-edge features to revolutionise the way professionals in the industry work. Let’s delve into what makes Flexi Complete a game-changer for designers, printers, and sign makers alike. Flexi Complete is the same Flexi you know and love but with a fresh new look and a bevy of improvements. Let’s see what’s new.
A Better User Experience
One of the standout features of Flexi Complete is its commitment to providing a seamless user experience. Flexi Complete brings a new look to the intuitive interface of Flexi. Designed to streamline workflows, users can navigate the software with ease, saving both time and effort. Whether you’re a seasoned professional or just starting out in sign making, DTF DTG, direct-to-vinyl, or other wide format printing applications Flexi Complete’s user-friendly design ensures that you can hit the ground running from day one.
Enhanced Design Capabilities
Flexi Complete empowers designers with enhanced capabilities to bring their creative visions to life. With an array of new tools and functionalities at their disposal, users can push the boundaries of design like never before. From advanced vector drawing tools to dynamic effects and filters, Flexi Complete offers unparalleled flexibility and control, allowing designers to unleash their creativity without limitations.
Optimised Printing Workflow
Efficiency is key in the world of printing, and Flexi is engineered to optimise every step of the printing workflow. With robust finishing tools and advanced color management features, users can ensure that their prints are accurate and of the highest quality, every time. Whether you’re producing large-scale signage or intricate graphics, Flexi’s printing capabilities are second to none.
Seamless Integration
Flexi seamlessly integrates with existing workflows, making it easy to incorporate into your existing setup. Whether you’re using other design software, RIP software, or hardware devices, Flexi plays nice with others, ensuring a smooth transition and minimal disruption to your operations. Flexi Complete offers a total package from design to production, including a powerful 64-bit RIP to give users a seamless workflow from start to finish.
Commitment to Innovation
At its core, Flexi Complete is a testament to SAi’s commitment to innovation. With a dedication to pushing the boundaries of what’s possible, SAi continues to raise the bar in the world of design and printing software. Flexi Complete is not just a product but a reflection of SAi’s ongoing mission to empower professionals in the industry with the tools they need to succeed.
With its intuitive interface, enhanced design capabilities, optimised printing workflow, seamless integration, and commitment to innovation, Flexi Complete is made to revolutionise the way professionals in the sign and print industry work. Whether you’re a designer, printer, or sign maker, Flexi Complete is the ultimate tool to bring your creative visions to life.
About SA International (SAi).
Headquartered in Salt Lake City, Utah, SA International (SAi) is recognised as the global leader in providing software solutions for the sign making, digital printing, textile, and CNC machining industries - from design to production. SAi's Flexi family of software products rank as the world's number one software for sign making and digital printing, outselling all competitors combined. Flexi is found on more wide-format printers than any other software. In addition, the company is one of the leaders in the CNC machining and router markets with its EnRoute CAD/CAM software.
SAi has a large and loyal network of resellers around the world and has over 250,000 customers in more than 150 countries. SAi enjoys strong OEM relationships with industry-leading manufacturers. In addition to its USA headquarters, SAi has offices in Brussels, Belgium, Sao Paulo, Brazil, Shanghai and Hong Kong, China, Pune, India, Tel Aviv, Isreal and Tokyo Japan.